
Why Physical Therapy is Crucial After a Total Shoulder Replacement

Why Physical Therapy is Crucial After a Total Shoulder Replacement
Are you scheduled for a total shoulder replacement? While your surgeon has likely reviewed what you can expect from the procedure itself, you may have some questions about the rehabilitation afterward. Never fear: the King Physical Therapy physical therapists are here to guide you through the entire process with a little help from one of our former patients.
Meet The Patient (And the Surgery)
When Michael (not his real name) suffered a severe shoulder fracture, he knew he was going to need medical intervention to take care of it. He didn’t realize he was going to require a whole new shoulder!
Michael’s case was a little unusual because he was younger–in his mid-40s–and active. Most recipients of a total joint replacement, including shoulder replacement, opt for surgery to manage osteoarthritis pain. But these types of surgeries can also be performed when an injury is severe enough, as was the case with Michael, who fell on his shoulder during a particularly vigorous game of flag football.
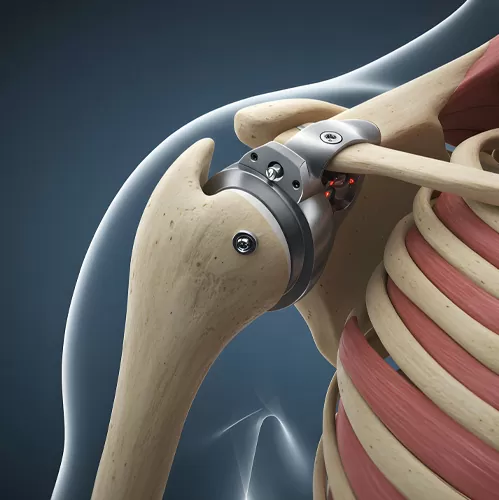
No matter the reason for a total shoulder replacement, the basic procedure is the same: a surgeon replaces the shoulder joint’s ball and socket parts with prostheses. Because this is a major surgery, physical therapy is crucial in helping you rebuild your shoulder’s strength and function.
The Early Days of Recovery
Michael’s surgery was successful, but his release from the hospital was just the beginning.
He began working on his physical therapy within the first days of release. At that point, his shoulder was still in a sling, so one thing his therapist helped him with was completing daily tasks, such as dressing and self-care.
However, it was also important for Michael to begin mobilizing his arm as soon as possible. Why? Because moving the joint facilitates healing and helps prevent the formation of scar tissue, which can lead to chronic pain and mobility issues down the line. We showed him simple exercises to jumpstart rehabilitation as the surgical site healed.
Restoring Mobility and Strength
After a few weeks, it was time for Michael to begin rehabilitating his shoulder in earnest. He no longer needed to use the sling by this point, but his shoulder was still very weak and stiff.
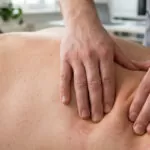
During his rehab session, we began with a round of manual therapy, using hands-on techniques to help reduce Michael’s pain, improve his restricted range of motion, and promote blood circulation to the area. This also helped prepare Michael’s shoulder for his prescribed exercises.
Initially, we focused on improving the mobility in Michael’s shoulder. We guided him through simple exercises that slowly restored his range of motion so that he could use his new shoulder just as well as his original.
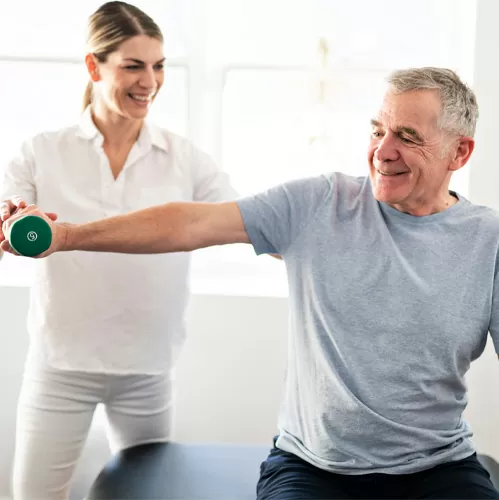
As his mobility improved and pain decreased, we began incorporating strengthening exercises into Michael’s rehabilitation. The muscles surrounding his shoulder were weakened both from his injury and the surgery itself, and he needed to restore that strength to regain function.
We started slowly, gradually increasing the resistance in Michael’s exercises as he improved.
No matter the reason for a total shoulder replacement, the basic procedure is the same: a surgeon replaces the shoulder joint’s ball and socket parts with prostheses. Because this is a major surgery, physical therapy is crucial in helping you rebuild your shoulder’s strength and function.
Finding Functionality
After several weeks, Michael was no longer dealing with persistent pain or restricted mobility. He was also well on his way to returning his shoulder’s strength to where it had been before his injury.
At that point, we began working on Michael’s functionality. As mentioned, Michael was an active individual, which meant he had some specific rehabilitation goals.
To help him achieve those goals, we retrained him on shoulder movements that were most important to him. We also helped him relearn shoulder movements that were significant in his day-to-day life, such as reaching overhead to grab something off a high shelf.
We also provided Michael with a detailed return-to-activity schedule, letting him know which shoulder movements he could safely perform and which would require modification as he continued through rehab.
Another Successful Rehabilitation
Michael’s post-surgical rehabilitation took a total of seven months, which is actually on the shorter end for someone recovering from a total shoulder replacement. But because Michael dedicated himself to post-surgical physical therapy, he saw swift results.
Do you want to learn more about the critical role of physical therapy after a total shoulder replacement? Call King Physical Therapy today to schedule an appointment!
Join Us for a Healthier You – Book Today!
Achieve your health goals at King Physical Therapy—reserve your session today!

Our Patients Get Great Results
“I had a total shoulder replacement, and Suzanne and Jacob are my therapists. They were both excellent. They were on time. If you’re thinking of a therapist for a shoulder, you need to see Suzanne and Jacob at King Physical Therapy in Martinsburg, WV. If I could I would give them 10 stars.”
-Ivan R.
Exercise of the Month
SHOULDER INTERNAL ROTATION STRETCH
Start by standing up straight holding a towel behind your back with one end over your shoulder and the other by your lower back. Grab the bottom end of the towel with your hand on the side you want to stretch and gently pull up on the towel with your other hand. Hold for 30 seconds.
2 Sets, 1 Rep. (Materials needed: towel)


5 Health Tips For The New Year
1. Shop Well For Yourself. It is more important than ever to stock your kitchen with healthy foods. Have healthy snacks handy. The more convenient they are, the more likely you are to eat them. Instead of thinking about what you shouldn’t eat, promise to eat your 3 to 5 servings of vegetables each day.
2. Schedule Your Exercise. Your schedule will be very hectic this year, like every year. Schedule your workouts just as you would any other appointment. It’s okay if you can’t make it to class, but make sure that you get some activity in at least three days per week.
3. Just Say No. You probably aren’t aware how much extra food you consume just from people offering it to you. A sample at the market here, an extra cookie at an office party there and it all adds up. Just think twice before you take that food and decide if you really want it.
4. Skip the Baking. Do you make baked goods for giving? Chances are you eat much of what you bake. Who wouldn’t? Instead make non-food gifts, or prepare ingredients for baked goods and put them in pretty jars—this year, let your gift recipient bake it up. That way, they can eat it when they want it and you don’t have to be tempted in the kitchen.
5. Hydrate. Keep your water bottle with you at all times. You should be drinking eight 8-ounce glasses of water each day. One handy trick is to buy a 64-ounce water jug. Fill it up in the morning and know that you need to finish it by the end of the day.
January Word Scramble
ioiearbnhtn
aoceeibrtln
seaeynwr
sneuoloirt
iplcmosy
orkrfsiwe
Answer Key
hibernation
celebration
new years
resolution
olympics
fireworks
Thank You for Subscribing!
Follow Us on Facebook

Stay connected with King Physical Therapy on Facebook! Follow us for expert tips on injury prevention, wellness inspiration, and updates on services—all designed to keep you moving and feeling your best.
Apple-Cinnamon Fruit Bars

Crust
- 1 cup chopped nuts (walnuts, pecans, almonds or hazelnuts) or old-fashioned rolled oats, divided
- ¾ cup whole-wheat pastry flour
- ¾ cup all-purpose flour
- ½ cup sugar
- ½ tsp salt
- 4 tbsp cold unsalted butter
- 1 large egg
- 2 tbsp canola oil
- 1 tsp vanilla extract
- ¼ tsp almond extract
Fruit Filling
- 6 cups diced peeled apples, divided
- 1/2 cup apple cider or orange juice
- ½ cup sugar
- ¼ cup cornstarch
- 1 ½ tsp ground cinnamon
- 1 tsp vanilla extract
Directions: Combine 3/4 cup nuts (or oats), whole-wheat flour, all-purpose flour, sugar and salt in a food processor; pulse until the nuts are finely ground. Add butter; pulse until well incorporated. Whisk egg, oil, 1 teaspoon vanilla and almond extract in a small bowl. With the motor running, add the mixture to the food processor for 30 to 45 seconds. Measure out 1/2 cup of the mixture and combine in a bowl with the remaining 1/4 cup chopped nuts (or oats). Set aside for the topping. Preheat oven to 400 degrees F. Generously coat a 9-by-13-inch baking dish with cooking spray.
Combine 4 cups apples, cider (or orange juice), sugar and cornstarch in a large saucepan. Bring to a simmer over medium heat, stirring for 4 to 5 minutes. Stir in the remaining 2 cups apples, cinnamon and 1 teaspoon vanilla. Transfer the dough to the prepared baking dish. Spread evenly and press firmly into the bottom to form a crust. Spread the fruit filling over the crust. Sprinkle the reserved topping over the filling. Bake the bars for 15 minutes. Reduce oven temperature to 350 degrees and bake until the crust and topping are lightly brown, 25 to 30 minutes more. Let cool completely before cutting into bars, at least 1 1/2 hours.
Meet Our Team

Karla King
PT, MPT, Cert. MDT

Suzanne Gregory
PT, MPT

Monique Mangram
Office Staff